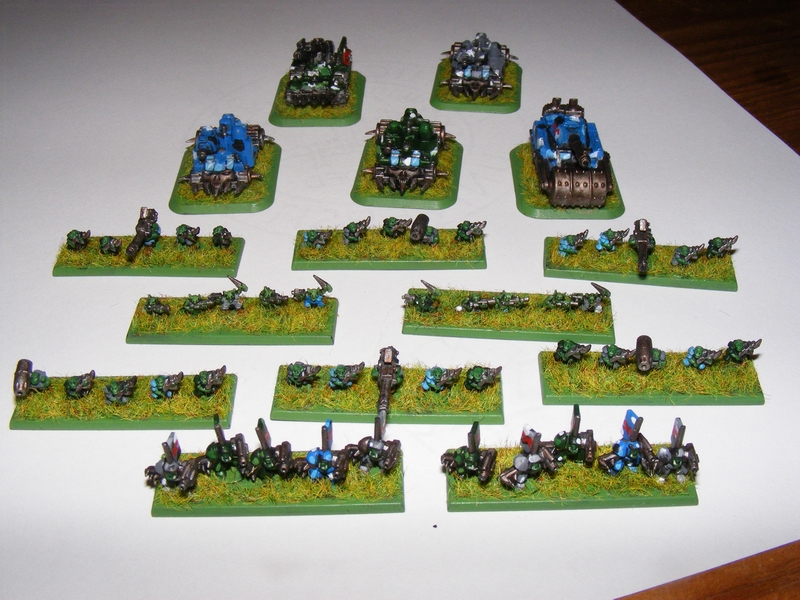
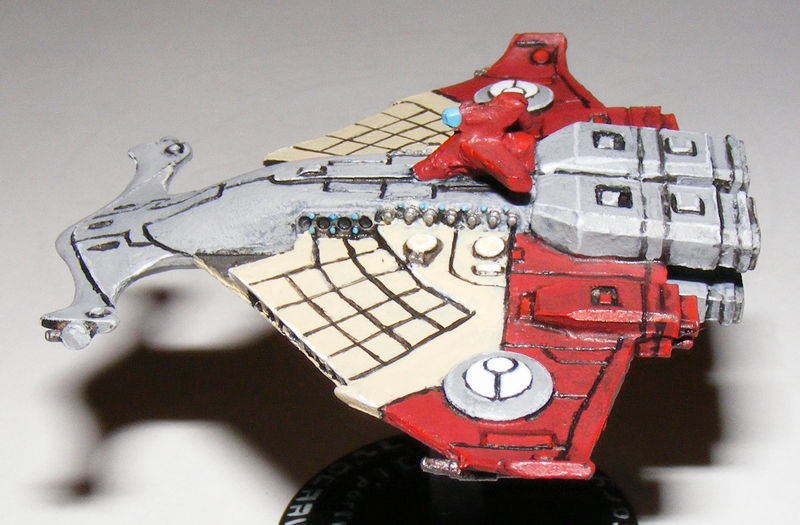
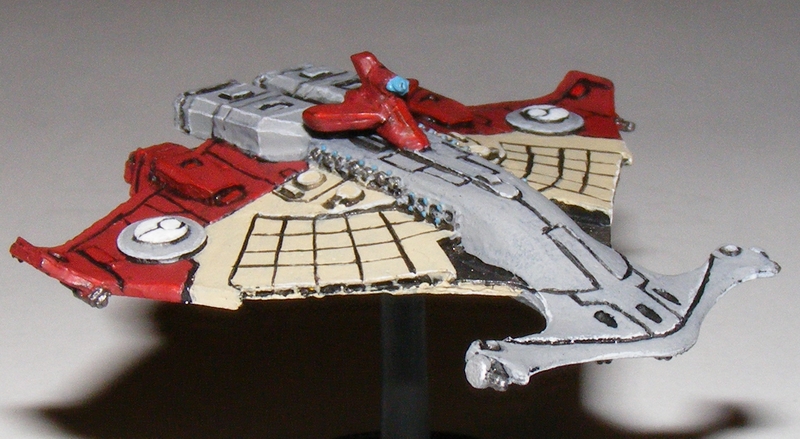
Epic Armageddon training game: Dominic (Orks) vs. Kyle (Space Marines)
Having just barely finished the last of the Ork units just in time, I was able to show Dominic and Kyle how to play Epic with two FULLY PAINTED 3000 point lists! Let’s get Epic!
—————————————————————————————–
Dominic – Orks
- ‘Uge Ork Warband with 18 Ork, 6 Gretchin, and 6 Nobs stands!
- Ork Warband with 6 Ork, 2 Gretchin, and 2 Nobs stands plus 3 Battlewagons, 1 Flakwagon and 1 Gunwagon.
- Ork Warband with 6 Ork, 2 Gretchin, and 2 Nobs stands plus 3 Battlewagons, 1 Flakwagon and 1 Gunwagon.
- Mekboy Stompamob with 3 Stompas
- Fighta Sqwadrun with 3 Fighta-Bommerz
- Kult of Speed with 6 Warbikes and 2 Buggies
- Big Blitz Brigade with 9 Gunwagonz, two of which have Supa-Zzap-Gunz
- Great Gargant with Warlord Character Upgrade
Kyle -Space Marines
- Tactical formation with 6 Tactical stands, 3 Rhinos, and a Supreme Commander upgrade.
- Devastator formation with 4 Devastator stands, 2 Rhinos, and 1 Hunter
- Terminator formation with 4 Terminator stands and a Chaplain upgrade
- Whirlwind formation with 4 Whirlwinds
- Assault formation with 4 Assault stands
- Assault formation with 4 Assault stands
- Thunderhawk Gunship
- Land Speeder formation with 5 regular Land Speeders
- Warlord Titan
Standard Tournament Scenario
—————————————————————————————–
Setup:


 —————————————————————————————–
Turn 1
Kyle teleports the Terminators right next to the gunwagons!
Strategy roll goes to the Orks! Dominic goes first.
Dominic takes an Engage action with the Kult of Speed, who charge the Terminators! …aaaaaaand bounce right off. No Terminators die, and the bikes are broken and fleeing.

Next, Dominic retains the initiative, and Doubles with the Blitz Brigade to put the hurt on the Warlord Titan. Just out of range with most regular Gunwagons, the Supa Zzap Gunz take down a grand total of… one void shield.

Kyle retaliates with a Sustained Fire action by the Titan. The Gunwagons are shattered and break.

Retaining, Kyle sets the Whirlwinds loose on the ‘Uge Ork Warband with Indirect Fire. Many gretchin die, much to the amusement of the orks!

Dominic moves the Evil Sunz mounted Warband up towards the objective with a Double.

Dominic tries to retain, but a poor roll leaves the Fighta Bommaz with a blast marker!

Kyle sends the Land Speeders to engage the Stompas. One Stompa goes down, breaking the formation.

Dominic turns the gunz of the Great Gargant on the Terminators! Three die, and the last flees!

Dominic takes a BIG GAMBLE and puts the ‘Uge Ork Warband on Overwatch! Will it pay off?

Kyle Advances the Devastators, firing on the broken Blitz Brigade and scattering their remnants further. However, a poor Dangerous Terrain roll loses the Hunter! The Marines have no anti air!

Retaining the initiative, Kyle Marches with the Tactical formation to hold an objective.

Dominic puts the Blood Axe Warband on Overwatch, as they babysit the Objective on the board edge.

Kyle declares an Air Assault with the Thunderhawk, which brings BOTH Assault formations and goes for the Evil Sunz mounted warband! AMAZING overwatch fire from the ‘Uge Warband kills three Assault stands, breaking one of the two formations, sending the survivors running. The remaining Assault marines open the battlewagons like tuna cans, and wipe the whole formation out!

—————————————————————————————–
Turn 2

Kyle wins the Strategy roll, and sends the surviving Assault formation after the broken Ork bikes! This assault was a complete disaster. Whiffs and poor armor saves, plus FOUR WHOLE ROUNDS of fighting finally wipe out the Assault Marines, and leave one Ork Bike stand alive.

Dominic Doubles the Great Gargant, and puts the Land Speeders in his sights! Poor rolls left four Speeders intact.

Kyle wanted to March to get the Warlord into position, but a blast marker ruins his day, and the Warlord end up moving once on a Hold action…

Dominic’s Fighta Bommers shake off their Blast Marker and put some SERIOUS hurt on the Whirlwinds!

The Land Speeders menace the ‘Uge Warband.

Having enough of the Land Speeder’s crap, the ‘Uge Warband charges them. The Landspeeders lose two and break, but the Warband loses two as well, and loses the combat, forced to flee.

Kyle’s Whirlwinds Marshall to remove their blast markers.

Dominic gives the Great Gargant a Double to move it out where it can do some good, as it has no enemies to fight! What a terrible fate for an Ork.

Kyle’s one remaining Assault Marine which regrouped earlier moves out and holds the objective.

Kyle bides his time, Advancing the Tactical marines, but not moving them.

—————————————————————————————–
Turn 3

Kyle wins the Strategy roll, and puts his Devastators on Overwatch.

Fighta Bommerz go after the last Assault Marine to clear the objective, but REALLY poor rolls keep the Assault Marines safe.

Kyle has a plan. He needs the Titan to go off, but first he chains the Tactical Marines to hold both objectives!

Kyle’s plan falls apart as the Warlord fails again.

Dominic, to deny Kyle the They Shall Not Pass condition, Doubles the Gargant to get into Kyle’s table half. Not to be outdone, Kyle Doubles his Devastators which loses a Rhino and a Devastator stand to dangerous terrain. Now, neither player has They Shall Not Pass.

Kyle’s Assault Marines move into cover to protect themselves.

Dominic gambles and wins, putting the ‘Uge warband on March, and a ridiculous daisy chain CAPTURES THREE OBJECTIVES!

Final Score:
Blitzkrieg: NONE
Break Their Spirit: NONE
Defend The Flag: ORKS
Take and Hold: NONE
They Shall Not Pass: NONE
Final Score: Space Marines 0, Orks 1 Victory for the Orks!
Next, another training mission!
Epic Orks aplenty, 3000 pt. Teaching List complete!
You saw my previous post, with the squid. That massive undertaking left me little time to finish the 3000 pts of Epic Orks that I promised to show my peeps in Highland tomorrow.
Just under the wire, I completed the last three formations. Job’s a good ‘un!


Next: see these models (and my Space Marines) in action as my Highland peeps check out Epic Armageddon! Stay tuned!
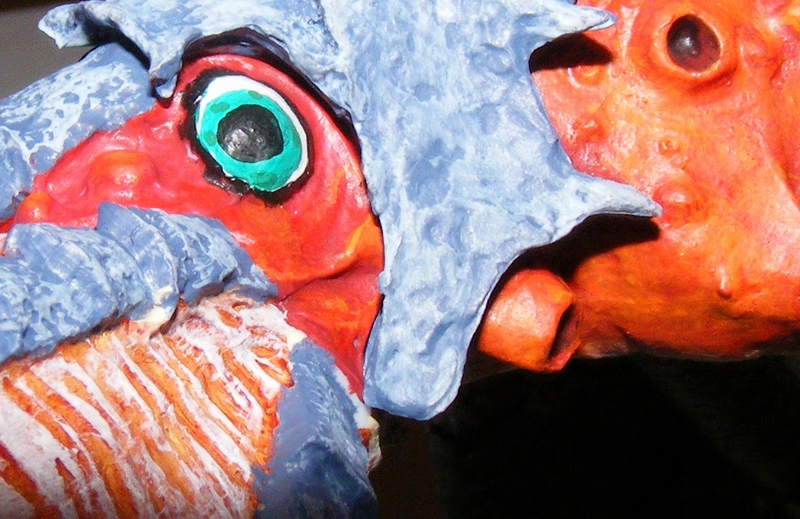
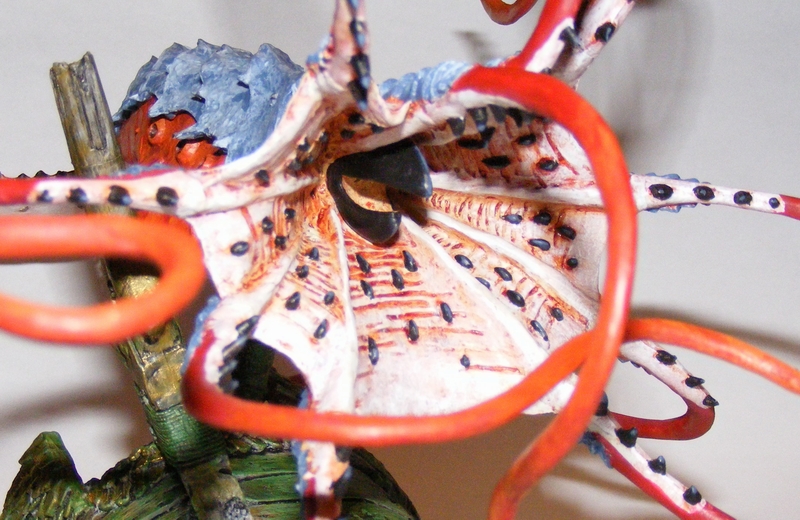
A Modest Cephalopod Proposal – Reaper Bones Unleash the Kraken!
For more than two years, I have been incredibly lucky. The most wonderful woman I have ever met has somehow come to love me as much as I love her. We both agreed that we’re going to get married at SOME point, but we’ve been distracted by the usual suspects. Poverty, illness, painting models, Lou Gossett, Jr., etc.
A bit more than a year ago, Reaper Miniatures began their second Bones Kickstarter, and like a sucker, I threw a small fortune at them. You know how it is. One of the add-ons offered was called “Unleash the Kraken!”
It was perfect. The love of my life has a POWERFUL ken for cephalopods. I ordered it and waited… a lot. Thanks China. But it arrived and I have been dutifully painting it.
Behold.
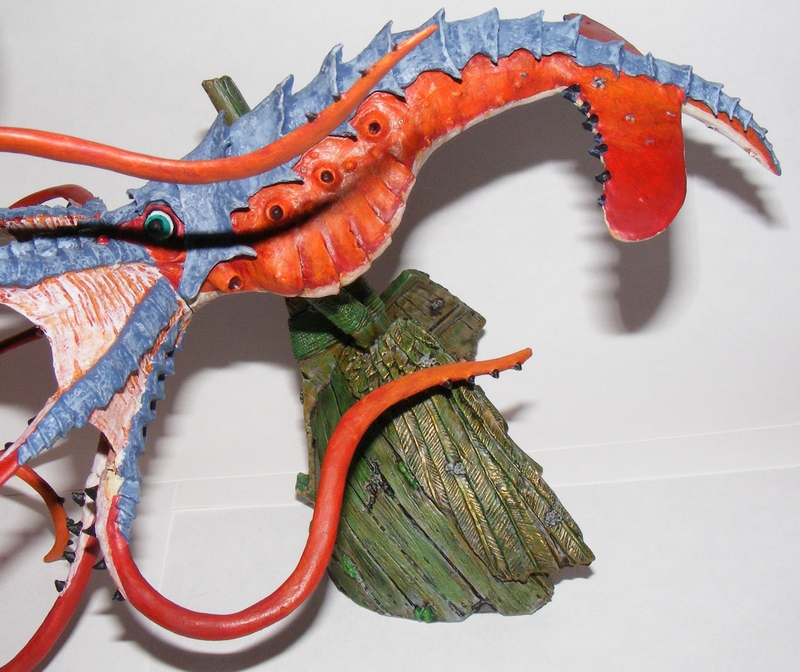
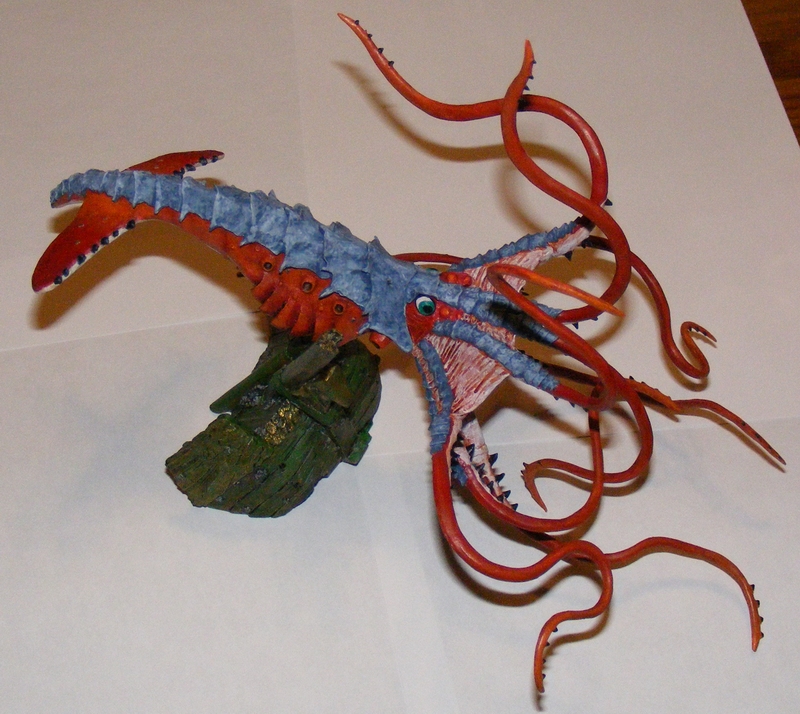
This masterpiece serves two purposes: a belated xmas present, and an official declaration to the world of my intent to marry her. She loved it.
Love is wonderful, but it’s not what this blog is about. Being the first Reaper Bones mini I’ve actually BOTHERED to paint, I’d be remiss without a thorough review of this product, and a complete breakdown of all the steps that led to this final, precious artifact.
———————————————————————————————-
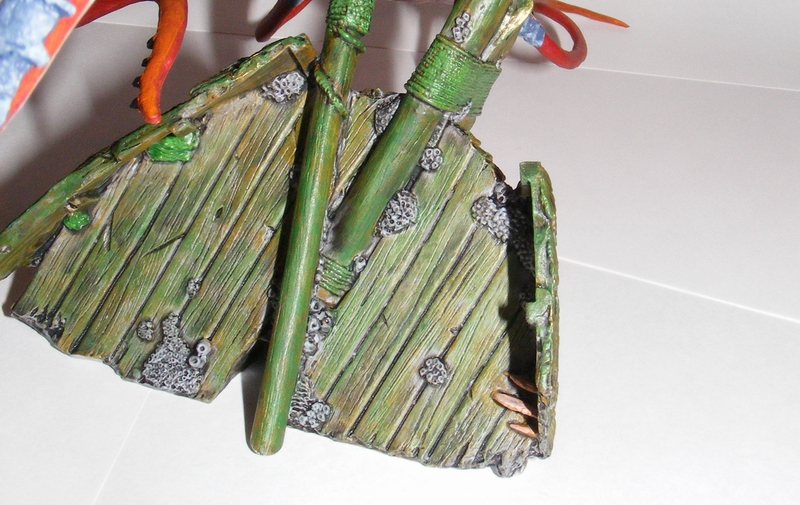
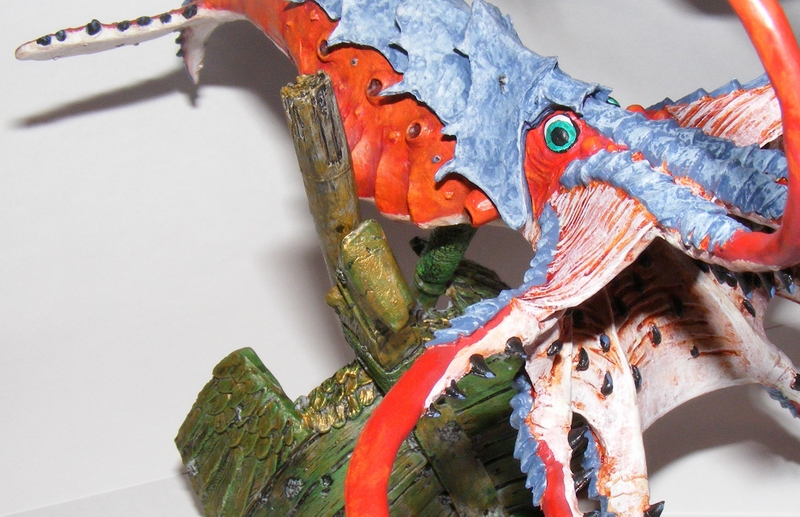
The Reaper Bones Miniature:
Beautifully sculpted, I followed the instructions on the Reaper Bones Preparation Guide. I washed the squid gently in soapy water, and dried each piece. The Beak, mouth/head, tentacles, body, ship, and mast holding up the squid are all seperate parts. Each part was carefully cleaned with a diamond file. The bottom of the body had some Reaper branding words that took a lot of elbow grease to scrape off.
———————————————————————————————-
Modeling:
I did a pre-assembly of some parts. The support mast was glued to the ship using super glue. Gaps between the ship and mast needed a bit of green stuff, which I modeled into barnacles to cover it up. I painstakingly arranged the tentacles about the mouth/head, and used more green stuff to join them more perfectly. It was joined later, after some parts were painted.
———————————————————————————————-
Painting:
As per the Reaper instructions, I (for the first time) used no primer. At first. The green stuff demanded primer, so I used a Reaper black paint on primer. As for the rest, the paint did stick… mostly. I found that 95% of the surface area of the model held paint with one coat. Some very small areas refused a second but paid heed to a third. Paint took an INCREDIBLE amount of friction to remove with rubbing, just as good as if it had been primered.
The ship was my first test to see how the paint stood up. I started by coating the entire ship with black. I then heavily drybrushed it (almost a wet brush) with Fortress Gray. I inked then entire ship with Army Painter black ink wash, and then hit the whole ship with another lighter drybrush of Fortress Gray. I then built up color with a drybrush of Snakebite Leather. The next layer was Snot Green, but only in places that face “up” where sunlight could reach algae. Ropes were given a much thicker coat, as algae would gain a stronger foothold in a softer surface. The eagle bowsprit was given a very light drybrush of Vallejo brand gold, to simulate fading gilt. Barnacles were picked out with Fortress gray, and washed to darken the insides. The shelf corals were hit with a custom blend of paints to make them a salmon/coral pink.
Next, I tackled the body. Colossal Squids tend to be orange, so I built up from Mechrite Red, to Blood Red, Firey Orange, and Blazing Orange. The belly was Bleached Bone washed with 50% Citadel Chestnut Ink and 50% water with one drop of dish soap (saved from at least a decade ago!). It was then drybrushed Bleached Bone and then lighter with White. Armor plates were Shadow Gray drybrushed Space Wolves Gray.
The head came next. The interior of the mouth was similar to the body. Teeth were black with a slight highlight of Shadow Gray. Face was similar to the upper body. The eyes were a challenge. I started black, and when I added white I left a circle of black around the edges for contrast. Vallejo brand teal for the eyes, and a mix of various paints to create a different teal for some eye freckles. I then did a circle of black for the pupil.
Tentacles were built up similar to the upper body, and spines are black with Shadow Gray.
The interior of the beak was bleached bone, with a small painted on orifice inside. Exterior is black with Shadow Gray highlights.
Finally, the Squid was assembled, touched up, and sealed with Testors matte varnish.
———————————————————————————————-
The final verdict: Thanks to Reaper’s master sculptors and the skills I have honed over 14 years, this is my finest work. There can be no better proposal, at least not with my skills.
…and by the way, she said yes!
Battlefleet Gothic 1505 Fleet Engagement – Marines vs. Imperial Navy
Had an amazing game of Gothic with Stephen, despite some setbacks. But first, a shout out to all the peeps at AFK games in Holt for all the incredibly diverse games played!
First, some amazing Eldar tanks with clear red glazed canopies that look great!

Next, some shots of an amazing super-weathered Mantis Warriors army, fighting hard to regain their honor after the Badab war. Those fellas could use a bit of fresh paint. How about it, Munitorum?


Nathaniel’s white Imperial Guard tango with Mr. Cat’s tan colored Crimson Fists.

Josh’s Brettonians square off against some Lizardmen!

One table was set up with the Robotech miniatures game! Valkyries clashed with Zentraedi pods over a city!

Long time Fourstrands contributor Stephen (Dark Angels) was practicing for a tournament with his partner, who had a stunning Saim-Hann Eldar army.

Finally, there was even some Warmahordes! Here’s a nice Circle list led by Morvahna.

——————————————————————————————————
Scenario – Fleet Engagement – 1505 points
Battlezone – Primary Biosphere
——————————————————————————————————
Bozeman – Azure Flames Space Marines
-Piers, Master of the Fleet, one re-roll (aboard His Hammer II)
-Battlebarge His Hammer II
-Battlebarge His Anvil
-Strike Cruiser Sacrifice, extra shield (squadroned with following two ships)
—Strike Cruiser Vigilance, extra shield
—Strike Cruiser Courage, extra shield
-Nova Frigates x2, Flame Squadron
——————————————————————————————————
Stephen – Imperial Navy
-Admiral (Ld9), one re-roll (aboard the Mars class battlecruiser)
-Retribution Battleship
-Mars Battlecruiser (squadroned with following two ships)
—Dominator Cruiser
—Gothic Cruiser
-Dauntless Light Cruiser, lances
-Sword Frigates x3
-Firestorm Frigates x3
-Cobra Destroyers x2
——————————————————————————————————
The Azure Flames Space Marines deploy in a Wedge (white area) to cut into the Sphere of the Imperial Navy (gray area). Deployment map C:


——————————————————————————————————
Azure Flames turn 1
His Hammer II launches Thunderhawks and comes about. Strike Cruisers go on All Ahead Full. His Anvil fires Thunderhawks and Boarding Torpedoes to put the Imperials on the defensive. Novas move up the edge of the board.
 The Imperials are denied.
 A threatening volley is fired!
 Novas try to creep up the board edge.
Imperial Navy turn 1
The squadron of cruisers turns on His Anvil, which braces. One Nova Cannon misses, but another hits! …doing one hit. Amazing fire from the Sword frigates lower the Battlebarge’s other two shields. Torpedoes from the Gothic stop the boarding torpedoes. The rest of the fleet comes about to re-engage. Thunderhawks take out one of the two Cobras.
 Nova Cannon? More like marshmallow cannon.
 Cobras get too close, and Thunderhawks make them pay.
Azure Flames turn 2
His Hammer II goes on All Ahead Full and leaves the Imperials in the dust (cloud). Strike Cruisers pool their Thunderhawks and fire a 6 strong wave. Novas and His Anvil destroy 2 of the 3 Sword frigates.
 Here come the Space Marines!
 The Novas pounce!
Imperial Navy turn 2
Mars launches 4 fighters which take up CAP duties in the squadron. Gothic launches torpedoes, but a terrible Turret roll by me and a terrible Torpedo roll by Stephen means all 6 torpedoes go right through me! Up close and personal Nova Cannon shotguns hit His Anvil hard, but fantastic Brace saves prevent any damage. Thunderhawks approach. Remaining Sword goes on a suicide charge at the Novas. The rest of the fleet goes on All Ahead Full with some fantastic leadership rolls!
 Nova Cannons lay into His Anvil, which weathers the storm.
  The Sword prepares to sell its life dearly…
 Don’t spare the plasma!
Azure Flames turn 3
Remaining Sword lives, despite failing to Brace for Impact, TWICE! Strike Cruisers mass for a strength 18 torpedo wave! One Thunderhawk splits off to remove the screen from the Gothic class. This along with fire from His Anvil cripples the Gothic class, causing an Engine Room critical. The Mars also gets an Engine Room critical and two fires from Thunderhawks.
 …h…HOW? HOW DID IT LIVE?
 The storm is coming…
Imperial Navy turn 3
Due to Engine Room criticals, the Gothic and Mars cannot turn, so they move minimum distance. Torpedoes fired by the Gothic several turns ago strike the Dauntless, causing one damage! Lagging fleet continues All Ahead Full. Nova Canon shot does 3 hits to the Courage, doing 1 damage, and causing an Engine Room critical! The surviving Sword disengages!
 Friendly fire!
 The Dominator draws blood from the Strike Cruiser Courage. A fantastic Nova Cannon shot makes it unable to turn!
Azure Flames turn 4
Thanks to the planet, His Anvil makes a turn and boards the Mars class, doing 9 damage and turning it into a drifting hulk. The Courage and the Vigilance board the crippled Gothic, making it a drifting hulk. The Sacrifice fires torpedoes and Thunderhawks at the Dominator, doing two damage and causing a Port Weapons Malfunction. His Hammer II launches Thunderhawks to menace the incoming escorts.
 The storm breaks upon the Imperials… (pictured above, the Vigilance is where the blank base is)
 Here comes trouble…
Imperial Navy turn 4
Dominator tries to disengage, but fails! The rest of the fleet sticks around to help it. Lance fire takes two shields down from His Hammer II.
 The rest of the fleet covers for the Dominator.
Azure Flames turn 5
Both Battlebarges go on Lock On, and the Strike Cruisers Come to a New Heading. The fleet does four more damage (with some poor rolls), crippling the Dominator. Turn not pictured.
Imperial Navy turn 5
All ships disengage, except the Firestorms who fail! They make for a Gas Cloud for cover… Turn not pictured.
Azure Flames turn 6
Strike Cruisers Reload Ordnance. 18 torpedoes kill the closest and farthest Firestorm, but an incredible brace roll saves the second Firestorm! …which then dies to Thunderhawk gunships. Game ends. Turn not pictured.
——————————————————————————————————
Final Score
Azure Flames – 907
Imperial Navy – 10
——————————————————————————————————
*squirts Mountain Dew out of nose*
…OK.
Well! Let’s see what happened. I got a great deployment opportunity to divide the Imperials. Stephen had a 1500 list that he wanted to play, but it wasn’t tailored to fight Marines. Stephen could have unbalanced his deployment (because he had more to deploy) but he was about as balanced as I was. Next, I got lucky with some missed Nova Cannon shots and UNBELIEVABLE boarding rolls. His Anvil beat the Mars class by NINE. That killed a completely undamaged cruiser in one go. Finally, the two hulked ships remained as I held the field, giving me approximately 140 extra points. Finally I got 120 extra points because the Firestorms failed to disengage.
Next: Super Secret Project, Gothic or 40K at AFK and EPIC ARMAGEDDON at Highland!
Read this right now.
Normally I don’t make fourstrands my personal facebook page, but this thread came up, and I really liked it. Give it a read:
http://www.lounge.belloflostsouls.net/showthread.php?53617-Why-Don-t-They-Put-Their-Helmets-Onhttp://www.lounge.belloflostsouls.net/showthread.php?53617-Why-Don-t-They-Put-Their-Helmets-On
A great piece on the culture of the Imperium.
Gothic Demo at AFK – Stephen’s first game!
Before I begin with the battle report, I must show off a painting technique I saw at AFK. A player there had a fantastic pre-heresy mostly Forgeworld Imperial Fist army. He has a painting technique for the right-angled grooves in Space Marine vehicles that I found intriguing. Here it is:
 I had always thought to highlight the edges, but here you see that the edges are DARKENED. I think it looks neat, and may try that on a future project…
But now, a BATTLE REPORT!

Recently, I’ve been cross-posting on the Battlefleet Gothic facebook group page. (for those here from that, hi everyone!) Stephen has long been a fan of Battlefleet Gothic, collecting a massive Imperial Navy fleet with a smaller Chaos fleet alongside it. He’s even painted it all! However, for twelve years, NO ONE HAS PLAYED BATTLEFLEET GOTHIC WITH HIM!
That changed last night. Stephen came prepared with a nice 1500 point list, but having never played, I convinced him to play my (all too familiar) training scenario. Luckily for him, he had the ships to play the Imperial Navy without borrowing any of mine!
——————————————————————————————————————-
Battlefleet Gothic training scenario – Modified Cruiser Clash
Bozeman – Chaos
-Slaughter class cruiser Swiftboat of Truth
-Slaughter class cruiser Traitor’s Blade
-Carnage class cruiser Overkill, Chaos Lord (+2 Ld), re-roll.
-Murder class cruiser Domination
Stephen – Imperial Navy
-Lunar class cruiser, Commander (Ld 8), re-roll
-Lunar class cruiser
-Tyrant class cruiser
-Gothic class cruiser
——————————————————————————————————————-
Setup:

—————————————————————————————————–
Turn 1 – Chaos
The Traitor’s Blade (left side pictured) goes on Come to a New Heading to maneuver around a gas cloud. Other ships fire at the Gothic class and take down its shields.

Turn 1 – Imperial Navy
The two Lunar class ships fire torpedoes at the Traitor’s Blade. Poor brace save rolls cripple it. The Gothic and Tyrant fire torpedoes at the Carnage, but good brace saves protect against all but one damage.


Turn 2 – Chaos
Murder class and the Swiftboat of Truth go on Lock on, and damage the Tyrant class once, collapsing its shields with a lucky crit! The Murder also turns its guns on the Lunar with the Imperial Commander, while the crippled Traitor’s Blade attempts a boarding action. A poor roll gives the Traitor’s Blade two more damage.


Turn 2 – Imperial Navy
Tyrant class disengages. The Gothic goes on Lock on. Good brace saves protect the Carnage with the Chaos Lord and the Murder class. The two Lunars gang up on the wounded Traitor’s Blade, with one going on Lock on. Ironically, the Locked On ship does nothing, while the braced Commander’s ship does one more damage!


Turn 3 – Chaos
The Traitor’s Blade disengages (whew!) while the other Slaughter class, the Swiftboat of Truth goes on Come to a New Heading to get behind the Gothic. Other ships maneuver.

Turn 3 – Imperial Navy
Lunar without the Commander goes on Come to a New Heading, however the Commander’s ship fails a Command Check, even with a re-roll! The fleet wheels to face the remaining threats.

Turn 4 – Chaos
Slaughter class goes on Lock On while the rest go on Come to a New Heading to come about. Fire gives the Gothic class FOUR damage, even through Brace! Critical causes another Shields Collapsed result.

Turn 4 – Imperial Navy
Gothic disengages. Commander’s Lunar goes on Come to a New Heading while the other Lunar Reloads Ordnance and fires, leaving the wave just shy of the Slaughter.

Turn 5 – Chaos
Slaughter takes one damage by flying through Torpedoes without bracing, and gets up close and personal with the Lunar that fired them. Brace saves all but one damage but it it critical and damages the Port side weapons! This is TERRIBLE. Other Chaos ships Come to a New Heading again.

Turn 5 – Imperial Navy
Commander’s ship Reloads Ordnance, and the other Lunar repairs its Port weapons, too late to put them to use…

Turn 6 – Chaos
Murder goes on All Ahead Full to clear a gas cloud, but the Carnage fails a Command check, making it unable to Lock On! Fire does no damage to the Lunar, despite three ships giving it everything.

Turn 6 – Imperial Navy
Commander’s ship fires Torpedoes at the Chaos Lord’s Carnage class, crippling it! Despite having functional weapons, the other Lunar, being on Brace, holds fire to prevent the Torpedoes from having blast marker problems.

Turn 7 – Chaos
The fleet uses Come to a New Heading to wheel around. The Murder class can’t hit the Lunar that doesn’t have the Commander.

Turn 7 – Imperial Navy
Commander’s ship Reloads Ordnance while the other Lunar Comes to a New Heading. Commander fires torpedoes at the Chaos Lord’s crippled Carnage, but fails to hit.

Turn 8 – Chaos
Carnage with the Chaos Lord disengages. Slaughter Comes to a New Heading. Murder fires on the Lunar without the Commander aboard, but can’t do much but lower shields.

Turn 8 – Imperial Navy
Imperial Fleet disengages.
————————————————————————————————————
Final Score
Bozeman – 104.5
Stephen – 111.25
————————————————————————————————————
WOW! What a nail biter! It came close at the end. Stephen is super excited to really play this game, as he’s wanted to for ages. I’m glad I could oblige. Hopefully next week I’m not working so we can play a different mission.
Next: a super secret project, some Epic Orks, and more Rules Compendium updates!
Necrons vs. Dark Eldar – 510 pt. modified Cruiser Clash at Highland
Highland had their monthly meeting, but few showed. Rob wanted more Gothic (will he catch the Gothic bug?) so he tried out my Dark Eldar, and asked that I play…
…Necrons.
Yes, THOSE Necrons. How did he fare? Let’s find out!
———————————————————————————————————
Bozeman – Necron Harvest Fleet, 510 pts
-Scythe class cruiser Awakener.
-Shroud class light cruiser Desert Whisper.
-Dirge class raider x2, Khopesh Squadron.
———————————————————————————————————
Rob – Chosen of Shadow Dark Eldar, 500 pts
-Torture class cruiser Gift of Discord, Launch Bays
-Corsair class escort x3, Banes of Joy, Phantom Lances
-Corsair class escort x2, The Jesters, Impaler Assault Modules
———————————————————————————————————
Mission: Cruiser Clash
Modifications: 510 point limit, added celestial phenomena, no restrictions other than those in fleet list, victory points.
Location: Inner Biosphere (one Solar Flare)
———————————————————————————————————
Setup:


 ———————————————————————————————————
Turn 1 – Necron Harvest Fleet
Before turn 1 begins, A SOLAR FLARE OCCURS!
All ships go on All Ahead Full. Thanks to Inertialess Drives, the Scythe makes it all the way across the board and surprises the Dark Eldar. One lance Corsair is destroyed. The rest of the fleet moves up.

The Scythe surges ahead.

Necrons can be surprisingly fast.
Turn 1 – Chosen of Shadow Dark Eldar
Dark Eldar bombers bounce off of the Scythe, but Impaler Assault Modules disable the Lightning Arcs and prevent the Scythe from turning! So close to the edge, the Scythe is in danger of disengaging involuntarily. The entire Dark Eldar fleet goes on Come to a New Heading and turns fire on the Dirges, who brace to avoid damage.

Ancient enemy? Hardly.
Turn 2 – Necron Harvest Fleet
Scythe goes on Burn Retros to avoid going off the board edge. Dirges take out one more lance Corsair. Shroud continues to advance.

HIT THE BRAKES!
Turn 2 – Chosen of Shadow Dark Eldar
Reloads give the Dark Eldar enough ordnance to put 2 damage on the Scythe, re-applying the repaired critical effect preventing it from turning. Battery fire kills a Dirge despite Brace for Impact.

Turn 3 – Necron Harvest Fleet
Damaged, and unable to Burn Retros again, the Scythe chooses to move its full distance off the board to automatically disengage. The surviving Dirge also disengages. The Shroud goes on All Ahead Full to surprise the Torture cruiser Gift of Discord, causing 2 damage.

Turn 3 – Chosen of Shadow Dark Eldar
The Dark Eldar turn to face the Shroud. Necrons choose to trust their armor, and lucky battery fire causes 2 damage, crippling the Shroud.
 Ouch!
Ouch!
Turn 4 – Necron Harvest Fleet
Lightning arcs from the Shroud do little to the Torture.

Turn 4 – Chosen of Shadow Dark Eldar
Brace for Imapct saves the Shroud from more damage.

Turn 5 – Necron Harvest Fleet
Amazing battery fire despite being crippled and on Brace causes the Torture to take 2 more damage, crippling it and applying a Prow critical result.

Turn 5 – Chosen of Shadow Dark Eldar
Phantom lance causes 2 damage to the Shroud, reducing it to a drifting hulk.
———————————————————————————————————
Final score:
Bozeman – 100
Rob – 554
———————————————————————————————————
…AAAAAAAAAAAAAAAAAAAAAAAAAAAAAA
I haven’t had a loss this bad since I first got into 40k. That’s a 454% margin of loss. Plus, Rob scored more victory points than the game was worth.
Necrons can’t split up or they get picked off. Plus, charging forward was stupid as it left me in a position to get forced off the board. I also set up weird, splitting my forces so that Rob could refuse the flank. Rob got screwed by the Solar Flare, but recovered nicely.
Next: a game at AFK!
A piece of history: Battlefleet Gothic promo board decoration
Behold.
I’ve got some battle reports for the past few days to write up, expect them later tonight. However, this bore no further waiting. Pictured above is Dan, one of the owners of the fine establishment AFK Games in Holt, MI. In his hands is a piece of gaming history. Back in the 90’s when Battlefleet Gothic was new, GW gave out plexiglass table decorations that had been airbrushed with artistic starscapes, as a promo for Rogue Traders to get people into Gothic. I had no idea these existed until yesterday when Dan showed me the one he had hidden in his store room. This is part of a game I dearly love.
Perhaps one will go on ebay one day… probably not though…
Enough self pity. To writing! Expect not one but TWO Battlefleet Gothic reports, one from fabled Highland and one from our hometown folks at AFK! Stay tuned! To the website. You can’t really tune a website.
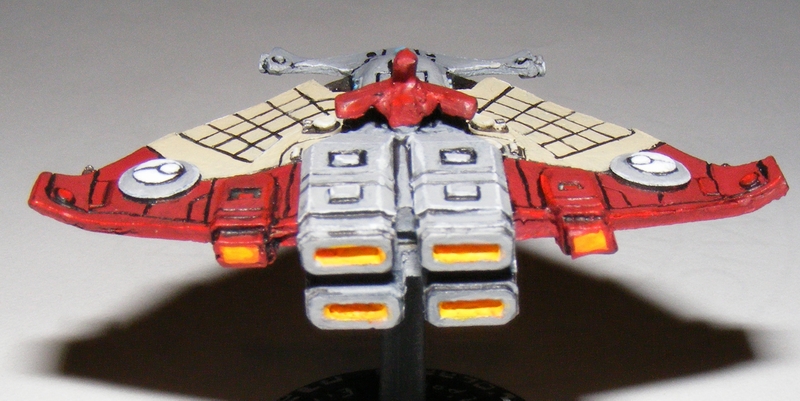
T’au Il’porrui Eir O’ran light cruiser


That’s the last of my Tau capital ships! Big thanks to Joshua who borrowed this fleet for my Tau campaign and graciously did all the legwork to name the ships. Well, now his names will live forever. Coming up next: Tau Escorts, a visit to my peeps in Highland, and HOPEFULLY I can get a Friday off so I can visit AFK and get some 40K on a regular basis. Stay tuned!
Battlefleet Gothic – Marines vs. Tyranids – A Long Time Coming
I’ve been on a Gothic kick, and just coincidentally my good friend John who got me into Gothic came into town. We weren’t going to play anything due to a delayed start from inclement death weather, but John sort of pulled a huge guilt trip and I set up my old dusty table I bought from the closing Games Workshop Novi.
John decided to play his new Tyranid fleet, but they were packed in the same case as his home made Ork Roks, so I snapped this pic:

John’s Tyranid fleet is only half complete, so he used some paper cutout proxies. As much as I like models, I have to admit they look good.


———————————————————————————————–
Scenario – The Raiders
Battlezone – Deep Space
Tyranid defenders are at -1Ld for the first 4 turns
———————————————————————————————–
John – Tyranid Hive Fleet 2501 – 1500 points (Defender)
-Two Hive Mind Re-rolls
-Hive Ship, upgrade to Ld 9, Prow Feeder Tentacles, Thorax Bio Plasma, 3x Port/Starboard Bio Plasma
-Hive Ship, upgrade to Ld 9, Prow Feeder Tentacles, Thorax Launch Bays, 3x Port/Starboard Launch Bays
-Cruiser, Prow Massive Claws, Thorax Massive Claws, 2x Port/Starboard Bio Plasma
-Cruiser, Prow Massive Claws, Thorax Massive Claws, 2x Port/Starboard Bio Plasma
-Cruiser, Prow Massive Claws, Thorax Massive Claws, 2x Port/Starboard Bio Plasma
-Kraken x6, Massive Claws
-Escort Drone x7, 6x Bio Plasma, 1x Fire Ship
-Escort Drone x7, 7x Bio Plasma
———————————————————————————————–
Bozeman – Azure Flames Space Marines – 750 points (Attacker)
-Zeraf Antonius, Master of the Fleet (Ld 10), 2 Re-Rolls, Honour Guard (aboard the Honor)
-Strike Cruiser Honor, Extra Shield
-Strike Cruiser Duty, Extra Shield
-Strike Cruiser Courage, Extra Shield
-Strike Cruiser Vigilance, Extra Shield
———————————————————————————————–
Setup:

Turn 1 – Azure Flames
Two squadrons, the Honor with the Duty and the Courage with the Vigilance come in from the right side, both squadrons going on Lock On. Fantastic battery fire and poor Kraken brace saves destroy the entire Kraken squadron. Bombardment cannons and twenty four torpedoes destroy the paper Cruiser.

The Hive Fleet, massing to attack this system, is surprised by Space Marines!

Four Strike Cruisers do some serious damage.
Turn 1 – Hive Fleet 2501
Dead cruiser drifts forward, other cruisers and escorts go on Come to a New Heading to respond to the Space Marine threat. Carrier Hive Ship launches 8 fighters, and they perform various CAPs. Thunderhawk Gunships move out.

The Tyranids, caught napping, begin the lengthy process of turning around.

Thunderhawk flights away.
Turn 2 – Azure Flames
Both squadrons Reload Ordnance. One Escort Drone is destroyed by Thunderhawks, causing a Brace.

Turn 2 – Hive Fleet 2501
Escort Drones with the Fire Ship go on All Ahead Full. Thunderhawks hit the Hive Ship, causing a Brace and disabling the Feeder Tentacles. Woo. Carrier launches 8 more fighters.

Thunderhawks sow confusion in the Tyranid fleet.
Turn 3 – Azure Flames
Fleet moves up. Poor bombardment cannon rolls do nothing to the Escort Drones, but scare them into a Brace. Torpedoes cause three damage to the Hive Ship and one damage to the Cruiser. Thunderhawks cause three more effects to disable the Feeder Tentacles on the Hive Ship. During the Ordnance Phase, some Tyranid Fighters arrive a bit late.

It’s time for… MORE TORPEDOES!
Turn 3 – Hive Fleet 2501
Cruiser pulls up and fires, doing one damage to the Honor. Rest of fleet continues to wheel. Several fighters are voluntarily removed so that the Carrier Hive Ship can launch 8 Assault Boats.

Turn 4 – Azure Flames
Both squadrons go on Lock on. Fire removes four Escort Drones from one squadron (including the Fire Ship) and one from the other.

Turn 4 – Hive Fleet 2501
Close enough to fire, the fleet pulls off major manuevers to fire every gun they can. The Honor is crippled.

Turn 5 – Azure Flames
Fleet disenages. The squadron with the Honor almost fails, but a re-roll gets them safely away. Game over.
 ———————————————————————————————–
Final Score
Azure Flames: 366
Hive Fleet 2501: 149
———————————————————————————————–
Post Game: I could have won on turn 2 by disengaging. However, that would have been boring. This result had a smaller margin of victory, but was much more in-keeping with the fluff. After all, the Space Marines would try to hurt the Tyranids as much as possible before they got too far in-system. John had all of his ships facing towards the left of the setup picture above, so I came in from the right. My nimble Strike Cruisers outmaneuvered his Tyranid space cows. Escort Drones and Cruisers have a 45 degree turn. Ugh. The Raiders is a tough one for the Defender. You need to be facing every direction, and you need fast maneuverable things to respond to any threat.
Coming up next, more Gothic and perhaps some 40K from Highland! I also hope to go back to AFK this coming Friday, unless something happens. Stay tuned!